

Rougamo Bread Recipe | Authentic Chinese Flatbread

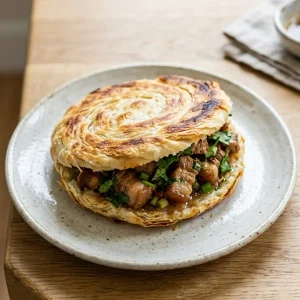
The first time I tasted a real rougamo on a side street in Xi’an, that crackly, golden flatbread giving way to layer upon flaky layer around the most savory braised pork, I genuinely understood why people call it the world’s oldest burger. The magic, I quickly learned, is almost entirely in the bread, not the filling, and recreating that magic at home is more achievable than you might think.
This rougamo bread recipe walks you through authentic baijimo, with that signature tiger’s back crust, iron circle edge, and beautifully layered soft inside. If you want to make Xi’an’s two thousand year old flatbread in your own kitchen, you are in exactly the right place. Let me show you how it is done.
How to Cook Rougamo Bread (Step Overview)
The cooking method is where the magic visibly happens. Here is the journey from raw round to perfect baijimo.
Pan-Frying for the Tiger’s Back
Heat a heavy cast iron or stainless steel skillet over low heat with a little oil, then place a bread in the pan. Cook slowly for five to seven minutes on the first side, watching as those distinctive golden spots and streaks of the tiger’s back pattern emerge on the bottom.
Flipping at the Right Moment
When the underside is well marked with the tiger’s back pattern and the bread feels firm at the edges, flip it gently and cook the second side. Cooking it in two phases like this gives both sides their proper character.
Pressing for the Iron Circle
While the second side cooks, gently press the edges of the bread against the hot pan with a spatula. This is what creates the iron circle, that crisp ring around the outside. Press lightly and patiently rather than smashing it down, and the ring will form beautifully.
Finishing in the Oven (Optional)
For maximum puff and a crisper exterior, transfer the pan fried breads to a hot oven for five to eight minutes. They will puff up dramatically, separating slightly inside, creating the perfect hollow pocket for filling. This step is optional but lovely.
Rougamo Bread Recipe

Equipment
- Large Mixing Bowl
- Kitchen scale
- Wooden spoon or dough whisk
- Rolling Pin
- Damp cloth or plastic wrap
- Pastry brush
- Heavy cast iron or stainless steel skillet
- Spatula
- Cooling rack
Ingredients
- 500 g 4 cups all-purpose flour
- 300 ml 1¼ cups warm water (38 to 40°C / 100 to 104°F)
- 5 g 1¾ tsp active dry yeast (or 1 tsp instant)
- ½ tsp sugar
- ½ tsp salt
- ½ tsp baking powder optional, for fluffier texture
- 60 to 80 g melted lard or neutral oil for a modern version
- A pinch of salt
- 1 tsp all-purpose flour mixed with the lard for a paste
- 1 to 2 tbsp neutral oil
- Braised pork belly beef, or lamb (for roujiamo filling)
- Chili oil
- Fresh cilantro and chopped green onions
Instructions
- Activate the yeast. In a small bowl, dissolve the yeast and sugar in warm water at 38 to 40°C. Let it sit for 5 minutes until frothy. Boiling water will kill the yeast, so use a thermometer if unsure.
- Make the dough. In a large bowl, mix the flour, salt, and baking powder if using. Gradually add the yeast water, mixing until a shaggy dough forms. Turn out and knead for 10 minutes, until smooth, firm, and elastic.
- First rest. Cover the dough with a damp cloth and let it rest for 20 minutes, since this relaxes the gluten.
- Second knead and proof. Knead for another 3 to 5 minutes. Cover and proof for 1 hour, or until visibly puffy.
- Prepare the lard paste. Mix the melted lard with a pinch of salt and 1 tsp flour into a thin paste. This paste creates the signature layers.
- Shape the bread. Divide the dough into 6 equal pieces, about 130g each. Roll one piece into a long, thin oval, about 4 inches wide and 12 inches long. Brush generously with the lard paste, all the way to the edges. Roll tightly from one short end into a coil, stand it on one end, flatten with your palm, then roll into a 5 to 6 inch round about ½-inch thick. Repeat with all pieces.
- Final rest. Cover the shaped breads and let them rest for 15 minutes.
- Pan-fry the bread. Heat a heavy cast iron or stainless steel skillet over low heat. This low heat is critical. Add 1 to 2 teaspoons of oil and swirl to coat. Place a flatbread in the pan, working in batches. Cook for 5 to 7 minutes per side, pressing gently with a spatula to create the iron circle edge, until the tiger’s back pattern develops.
- Optional oven finish. For the most dramatic puff and crisp, transfer the pan-fried breads to a 375°F (190°C) oven for 5 to 8 minutes.
- Rest and serve. Transfer to a cooling rack and let rest for 2 to 3 minutes. Slice horizontally like a pita, keeping the bottom edge intact like a hinge. Stuff with braised meat, vegetables, herbs, and chili oil, and serve immediately.
Notes
- Water temperature is critical. 38 to 40°C is the sweet spot, since too hot kills the yeast and too cold will not activate it.
- The 10-minute rest after the first knead is non-negotiable, since skipping it means the dough fights you when rolling.
- Low heat is the number one secret. Authentic baijimo cooks slowly, since high heat burns the outside before the inside cooks through.
- Use a heavy cast iron or stainless steel skillet, not non-stick, since non-stick coatings cannot take the long, low cooking needed for the tiger’s back pattern.
- For the most authentic flavor and texture, use lard. Oil-based versions are good but lack the signature richness and flaky layers.

This Rougamo Bread Recipe was easy to follow and produced perfectly crispy, flaky flatbreads. The authentic Xi’an-style techniques made the results truly impressive!
This recipe delivers on every promise! The lard lamination and oven-finish technique produced the most authentic, crispy, and beautifully layered street-style bread.
The extra flour-sprinkle trick is absolute genius! It kept the layers completely separate, resulting in a perfectly crispy crust with an incredibly flaky, street-style interior.
Unbelievably authentic and easy to follow! The low-and-slow pan-fry trick gave the bread an amazing crackly crust while keeping the inside beautifully soft and layered.
The best guide for authentic baijimo online! Following the low-heat frying and resting times yielded a perfectly crisp iron circle edge and beautifully flaky layers.
This recipe completely nailed the authentic Xi’an texture! The precise temperature and shaping steps created a perfectly crackly crust with beautiful, pillowy layers inside.
An absolute masterpiece of a recipe! The traditional lard paste and low-and-slow frying gave me that perfect crackly tiger’s back crust and beautifully layered interior.
The secret flour-sprinkle trick is an absolute game-changer! My flatbreads turned out incredibly crispy on the outside with perfectly distinct, flaky layers inside.
Finally, a recipe that nails the authentic street-style texture! The low-heat method gave it a perfectly crispy tiger’s back crust with beautifully flaky layers inside.
This is the ultimate recipe for authentic baijimo! The clever dry flour sprinkle tip created incredibly distinct, flaky layers with that signature crispy tiger’s back crust.