

How to Make Thin Crispy Pizza Romana From Scratch

There is a pizzeria on Via dei Genovesi in Trastevere where the pizza romana arrives at the table thin enough to read a newspaper through, golden and crackling at the edges, with a bottom so crisp it makes a sound when you cut it. The locals call this kind of crust scrocchiarella, which is Roman dialect for crunchy, and once you taste a proper one, the puffy Neapolitan style starts to feel almost soft by comparison. This pizza romana recipe is exactly how I have learned to make it at home, and it is the recipe I reach for when I want crisp instead of pillowy.
What Is Pizza Romana?
Pizza romana is the thin, crispy, paper light pizza tradition of Rome. The defining feature is the texture: a low hydration dough rolled with a pin to an almost transparent thinness, baked at high heat for longer than a Neapolitan pizza, producing a uniformly crisp, crackling crust with no puffy outer rim. The cornicione that defines Neapolitan style is absent here. Pizza romana is crisp from edge to edge.
The toppings are familiar (tomato, mozzarella, anchovy, olive, mushroom) but the texture is completely different. This is the pizza that crackles when you bite it.
The History and Roman Origins of Pizza Romana
How Pizza Romana Developed in Rome
While Naples gets most of the attention in pizza history, Rome developed its own distinct tradition in the 20th century, when working bakers and pizzerias began rolling dough thin and baking it in flat metal pans or hot stone hearths at slightly lower temperatures than Naples. The Roman approach favored crispness over the soft, fast bake of the Neapolitan style, partly out of practicality (the ovens were different) and partly out of taste.
The result became its own beloved category, served across Lazio and known affectionately as the alternative to the Neapolitan tradition. Both are correct. Both are Italian. They are different breads.
The Scrocchiarella: Rome’s Signature Crispy Crust
Scrocchiarella is the Roman word for the audible crunch of a properly baked pizza romana crust. The word comes from the onomatopoeic Italian scrocchiare, meaning to crack or crunch, and Romans use it as both a description and a quality benchmark. A pizza without scrocchiarella has failed the basic Roman test. The crust should crackle audibly when you cut it and when you bite into it.
Pizza Romana vs Pizza Napoletana: Key Differences
Crust Thickness and Texture
Pizza Napoletana has a thin center and a puffy, charred outer rim called the cornicione. The texture is airy and slightly chewy. Pizza romana is uniformly thin across the entire surface, with no rim, and the texture is crisp throughout. Cutting a slice of pizza romana should produce a clean snap. Cutting a Neapolitan slice produces folding bread.
Hydration and Dough Style
Neapolitan dough sits at 60 to 65 percent hydration with no oil. Pizza romana dough sits at 55 to 60 percent hydration with olive oil added directly to the dough. The lower hydration and the oil are what produce the crispness rather than the softness. These are not optional adjustments. They are what define the category.
Cooking Time and Temperature
Neapolitan pizza bakes in 60 to 90 seconds at 900 degrees Fahrenheit. Pizza romana bakes for 10 to 14 minutes at 475 to 525 degrees. The longer bake at slightly lower heat is what drives off moisture and develops the all over crisp texture.
Use of Oil in the Dough
Adding 2 to 3 percent olive oil by flour weight transforms the dough. The oil coats the gluten strands, limits hydration absorption during the bake, and produces a thinner, crisper, more crackling crust. This single ingredient difference is one of the biggest signatures of pizza romana versus its Neapolitan cousin.
Two Main Styles of Pizza Romana
Pizza Tonda Romana: Round, Thin and Crispy
The round, thin pizza served at pizzerie across Rome. Individual portions, one pizza per person, rolled thin and baked on a stone hearth or pizza stone. This is what most people mean when they say pizza romana without specifying.
Pizza al Taglio: Roman Square Slice by Weight
A completely different style, also Roman. Rectangular pizzas baked in long oiled trays, sold by weight, cut with shears at the counter. Higher hydration, much longer fermentation, eaten as street food. Same city, different category. Most of this article focuses on pizza tonda romana, but al taglio gets its own section later.
Ingredients for Pizza Romana
Dough Ingredients
Five hundred grams of Caputo 00 flour, 280 grams of water at room temperature (that is 56 percent hydration), 10 grams of fine sea salt, 1 gram of instant dry yeast, and 15 grams (about one tablespoon) of good extra virgin olive oil added to the dough. The olive oil is what makes this pizza what it is.
Tomato Sauce Ingredients
A 400 gram can of whole San Marzano DOP tomatoes, crushed by hand. A teaspoon of fine sea salt. A small drizzle of olive oil and a pinch of dried oregano. The sauce stays raw, applied thinly.
Cheese
Eighty to 100 grams of fior di latte per pizza, torn and drained on paper towels for 20 minutes. The cheese is applied sparingly. A heavy cheese layer fights the thin, crispy crust.
Classic Roman Toppings
Anchovies from Cetara, oil cured olives, capers from Pantelleria, sautéed mushrooms, artichoke hearts in oil, prosciutto cotto, salame piccante, fresh basil after the bake. Romans favor savory, briny, and slightly bold toppings on these thin pizzas.
Choosing the Right Flour
Why 00 Flour Is Used
Caputo 00 flour, particularly the blue Pizzeria bag, produces the silky, easy to roll dough that pizza romana requires. The fine mill creates a soft texture that rolls thin without tearing. For a 24 hour ferment, the blue bag is ideal. For longer ferments, the red Cuoco bag handles them better.
Adding a Small Amount of Semolina
Replacing 10 percent of the 00 flour with fine semolina adds a faint sweetness and a slightly crunchier finished texture. It is a small adjustment that suits pizza romana particularly well, since the goal is maximum crispness.
The Role of Olive Oil in the Dough
The olive oil added directly to the dough is the most important defining ingredient. It coats the gluten and slows water absorption during baking, which is what allows the dough to dehydrate properly and crisp from edge to edge. Skip the oil and you have made a thin Neapolitan, not a pizza romana.
The Secret to a Crispy Roman Crust
Lower Hydration (55 to 60 Percent)
The lower water content compared to Neapolitan dough means there is less moisture to drive off during the bake. The dough sets faster and crisps more aggressively. This is the single biggest hydration difference between the two pizza traditions.
Adding Olive Oil for Crispness
Two to three percent olive oil by flour weight produces a measurably crispier crust. The oil interferes with gluten strand formation in a controlled way, producing a more friable, easily snapped texture that defines the Roman style.
Rolling Thin With a Pin: Not Hand Stretching
This is the technique that separates pizza romana from every other major pizza style. Use a rolling pin. Roll the dough out to roughly 2 to 3 millimeters thick, almost translucent when held to the light. Hand stretching produces a thicker, less even crust with a natural puff at the edges. The rolling pin produces uniform thinness across the entire pizza.
High Heat, Longer Bake Time
Pizza romana bakes for 10 to 14 minutes at 475 to 525 degrees Fahrenheit, not 90 seconds at 900. The longer bake at slightly lower temperature is what drives moisture out of the thin crust and produces the cracker like texture. Bake it as you would bake a Neapolitan and the pizza burns before it crisps. Bake it longer and lower and it transforms.
Best Cheese for Pizza Romana
Fior di Latte Mozzarella
Cow’s milk mozzarella torn into pieces and drained well. The default cheese for pizza romana and the right choice for almost every variation. Use less than you would on a Neapolitan to preserve the crispness.
Mozzarella di Bufala (Less Common in Rome)
Buffalo mozzarella appears occasionally on pizza romana menus, but its high moisture content fights the dry, crisp texture that defines the style. If you do use it, drain it for longer than usual and use sparingly.
Adding Pecorino Romano
The cheese of Rome. Grated finely over the pizza either before or after the bake, adds a sharp, salty, sheep’s milk character that is unmistakably Roman. Pecorino dusted after baking, alongside a turn of black pepper, is a classic combination on the cacio e pepe inspired pizza variation.
How to Make Pizza Romana Dough
Step 1: Mixing Flour, Water, Yeast and Oil
Combine the flour and water in a large bowl and stir with your hand until no dry flour remains. Cover and rest for 20 minutes (a shorter autolyse than for higher hydration doughs).
Add the salt, yeast, and olive oil. Squeeze through the dough with your fingers until everything is fully incorporated. The dough will feel firmer than a Neapolitan dough, more like a pasta dough or a bread dough.
Step 2: Kneading the Low Hydration Dough
Because the dough is lower hydration, you can knead on a lightly floured counter rather than just in the bowl. Knead for 8 to 10 minutes total, until the dough is completely smooth, elastic, and slightly tacky but not sticky. The lower hydration means it needs more aggressive kneading to develop the gluten structure.
The finished dough should be smooth as a baby’s skin and bounce back when pressed.
Step 3: Bulk Fermentation
Place the dough in a lightly oiled bowl. Cover and rest at room temperature for 1 to 2 hours. The dough will rise slightly and feel softer, though not as visibly active as a high hydration dough.
Step 4: Cold Proofing for 24 Hours
Divide into 2 balls of roughly 400 grams each. Shape each by tucking the edges underneath until smooth and taut. Place in lightly oiled lidded containers and refrigerate for 24 hours minimum, up to 48.
Pizza romana actually does not benefit from a 72 hour ferment in the same way that Neapolitan dough does. A 24 hour ferment is the traditional Roman target. The shorter ferment, combined with the oil in the dough, produces the specific crisp character. Longer ferments produce a softer, more open crumb that fights the desired texture.
Step 5: Forming the Dough Balls
Take the dough balls out of the fridge 1 to 2 hours before baking. They should feel firm, smooth, and well rested. Pizza romana dough does not need to be as bubbly as a Neapolitan dough at this stage.
How to Roll Pizza Romana Thin
Using a Rolling Pin Instead of Hands
Flour the work surface and the rolling pin. Place the dough ball in the center and press flat with your palm. Begin rolling from the center outward, rotating the dough a quarter turn between passes to maintain a roughly round shape. Apply moderate pressure.
If the dough resists and springs back, walk away for 10 minutes to let the gluten relax, then continue. Forcing tough dough produces tears and uneven thickness.
Achieving Paper Thin Thickness
The target thickness is 2 to 3 millimeters. The dough should be thin enough that you can see the texture of the work surface through it slightly. If your fingertip leaves a dent that holds shape rather than springing back, the dough is properly relaxed and rolled to the right thinness.
Why Roman Pizza Has No Cornicione
Because there is no thick rim left when rolling, and because the entire pizza is uniformly thin, there is no puffy edge during the bake. The pizza romana is crisp from edge to edge with no soft, bread like ring. This is the visual and textural signature of the style and one of the most immediate ways to identify a proper one.
How to Assemble Pizza Romana
Spreading the Sauce Thinly and Evenly
Two tablespoons of sauce per pizza, spread in a thin even layer across nearly the entire surface, leaving a half inch border. Unlike the spiraled center heavy application on a Neapolitan, pizza romana sauce should reach close to the edges. There is no thick rim to leave clear.
Layering Mozzarella
Scatter the drained fior di latte in small loose pieces across the sauce. Less cheese than you would put on a Neapolitan. The thin crust cannot support a heavy cheese layer without going soft. Spaced cheese pieces with visible sauce between them is the correct distribution.
Adding Classic Roman Toppings
Add toppings sparingly. Two or three small additions are enough. Anchovies, olives, capers, mushrooms, salame piccante. Pizza romana is not a vehicle for heaped toppings.
Baking Pizza Romana to Perfection
Ideal Oven Temperature
475 to 525 degrees Fahrenheit. Significantly lower than the maximum temperature used for Neapolitan pizza. Preheat the pizza steel for at least 45 minutes. The lower temperature combined with the longer bake is what drives moisture out without burning.
Bake Time (Longer Than Neapolitan)
10 to 14 minutes. Watch the pizza after minute 8. The bake is done when the crust edges are deeply golden brown, the cheese is fully melted with golden spots, and the bottom (lift a corner with a spatula) is crisp and evenly browned. The pizza should feel light when picked up by the edge.
Achieving the Crispy Scrocchiarella Texture
Two things produce the scrocchiarella. The thin dough rolled with a pin. And the longer, lower bake. Skip either step and you cannot achieve the texture. With both done correctly, the pizza will audibly crackle when you cut it.
Pizza Stone vs Sheet Pan Results
Pizza stone or steel produces the crispest bottom. The dough makes direct contact with the hot stone, and the high thermal mass radiates heat upward through the crust. A sheet pan works but produces a slightly less crisp result.
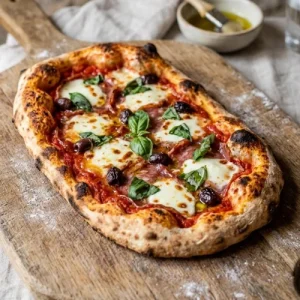
Easy Pizza Romana Recipe

Equipment
- Pizza steel or stone
- Rolling Pin
- Kitchen scale
- Pizza Peel
- Dough scraper
- Lidded proofing containers
- Kitchen shears
- Metal peel
Ingredients
- 500 grams Caputo 00 flour or 450 grams 00 plus 50 grams fine semolina for extra crunch 280 grams water at room temperature 10 grams fine sea salt 1 gram instant dry yeast (about a quarter teaspoon) 15 grams (1 tablespoon) extra virgin olive oil
- 400 gram can whole San Marzano DOP tomatoes 1 teaspoon fine sea salt 1 small drizzle extra virgin olive oil Pinch of dried oregano
- 70 to 80 grams fior di latte torn and drained 20 minutes on paper towels 2 to 3 fresh basil leaves, added after the bake 1 teaspoon extra virgin olive oil, for finishing Small pinch of flaky sea salt
Instructions
Make the Dough
- Combine flour and water in a large bowl. Stir with your hand until no dry flour remains. Cover and rest 20 minutes (short autolyse).
- Add salt, yeast, and olive oil. Squeeze through the dough with your fingers until fully incorporated.
- Turn out onto a lightly floured counter. Knead for 8 to 10 minutes until smooth, elastic, and slightly tacky. The dough should be firmer than a Neapolitan dough.
- Place in a lightly oiled bowl. Cover and bulk ferment at room temperature for 1 to 2 hours.
- Divide into 2 balls of roughly 400 grams each. Shape into tight smooth balls by tucking the edges underneath.
- Place in lightly oiled lidded containers. Refrigerate 24 hours.
- Remove from the fridge 1 to 2 hours before baking.
Prepare the Sauce
- Crush the San Marzano tomatoes by hand in a bowl until you have a textured purée.
- Add salt, olive oil, and oregano. Stir and taste. The sauce should be bright, salty, and slightly acidic.
- Refrigerate until ready to use.
Roll and Assemble
- Tear the fior di latte into rough pieces and drain on paper towels for 20 minutes.
- Flour the work surface and a rolling pin generously.
- Press a dough ball flat with your palm in the center of the work surface. Begin rolling from the center outward with the rolling pin, rotating the dough a quarter turn between passes.
- Continue rolling until the dough is 2 to 3 millimeters thick, about 12 to 13 inches across, almost translucent when held to the light.
- If the dough resists, walk away for 10 minutes to let the gluten relax, then continue.
- Transfer to a well floured peel. Shake gently to confirm the dough is sliding freely.
- Spread 2 tablespoons of sauce in a thin even layer, reaching close to the edges with only a half inch border.
- Scatter the drained fior di latte in small loose pieces across the sauce.
- Brush the outer rim lightly with olive oil for extra color and crispness.
Bake to Crispy Perfection
- Preheat the pizza steel at 500 to 525 degrees Fahrenheit for at least 45 to 60 minutes.
- Slide the pizza onto the steel and bake for 10 to 14 minutes. Watch closely after minute 8.
- The pizza is done when the crust edges are deeply golden brown, the cheese is melted with golden blistered spots, and the bottom is crisp and evenly browned when lifted with a spatula.
- Pull the pizza onto a cutting board. Drizzle with olive oil. Tear basil over the top and add a pinch of flaky sea salt.
- Cut with kitchen shears or a sharp pizza wheel and serve immediately while the crust is at peak crispness.
Notes
- Brush the rim of the pizza lightly with olive oil before launching. This trick from a Roman pizzaiolo adds an extra layer of crispness and color to the edge during the longer bake. A small step that genuinely changes the finished pizza.
- Roll the dough genuinely thin. Most home cooks underroll because the dough feels fragile. Push past hesitation. 2 to 3 millimeters is correct, not 5 or 6.
- Use less cheese than feels right. The thin crust cannot support a heavy cheese layer. About 70 percent of what you would use on a Neapolitan of the same size is correct.
- Cut with kitchen shears, not a pizza wheel. The shears preserve the integrity of the thin crispy crust better and produce a cleaner finish.
- Bake one pizza at a time. Let the steel recover for 5 to 7 minutes between pizzas. A cool steel produces a soft bottom on a thin pizza, which defeats the entire purpose.

Absolutely spot on! The rolling pin technique and low hydration gave me that perfect paper-thin, crackling scrocchiarella crust right at home. A definitive 5-star recipe!