

Easy Halloween Recipes for Parties & Kids (2026)

Halloween is that one magical time of year when food gets to be just as fun as the costumes! Whether you’re throwing a haunted house party, trick-or-treating with the kids, or just craving something creatively spooky, the right Halloween recipes can turn your kitchen into the most exciting place in the neighborhood. In this ultimate guide, I’m going to walk you through everything you need to know about making the best Halloween recipes from history and ideas to step-by-step instructions for the most crowd-pleasing Halloween dish of all time: Halloween Mummy Hot Dogs. These are the kind of easy Halloween recipes that look incredibly impressive but are secretly a breeze to make.
Let’s get this spooky party started!
What Are Halloween Recipes?
Halloween recipes are themed food dishes, snacks, appetizers, desserts, and drinks that are designed to look spooky, creepy, or festive for the Halloween season typically enjoyed on or around October 31st. They use creative decorating techniques, Halloween-themed shapes, eerie color combinations (black, orange, green, purple), and fun names to match the holiday’s spirit.
Unlike regular everyday cooking, Halloween recipes are all about the wow factor. They’re designed to make people say “Ewww… but can I have another one?” Whether it’s a batch of witch finger cookies, graveyard brownie pans, candy corn cupcakes, or monster-faced deviled eggs these dishes deliver both flavor AND a visual experience.
What makes Halloween recipes especially exciting is that they don’t require you to be a professional chef. Most of the best Halloween recipes are beginner-friendly, use simple ingredients, and can be prepped ahead of time making them absolutely perfect for busy parents and party hosts.
History & Origin of Halloween Food Traditions
Halloween has its roots in the ancient Celtic festival of Samhain, celebrated over 2,000 years ago in what is now Ireland, the United Kingdom, and northern France. Samhain (pronounced “SAH-win”) was held on October 31st and marked the end of the harvest season and the beginning of winter a period that the Celts associated with darkness, cold, and death.
During Samhain, it was believed that the boundary between the living and the dead became blurred, allowing ghosts to roam the earth. People would light huge bonfires, wear costumes (often made of animal skins), and make offerings of food and crops to appease the spirits. This is actually where the tradition of food offerings on Halloween began.
When the Romans conquered Celtic territories around 43 AD, they merged Samhain with two of their own festivals: Feralia (commemorating the passing of the dead) and a day honoring Pomona, the Roman goddess of fruit and trees. The apple symbol of Pomona is believed to be the origin of the Halloween tradition of apple bobbing.
As Christianity spread through Europe in the 8th century, Pope Gregory III designated November 1st as All Saints’ Day (also called All Hallows’ Day), and October 31st became All Hallows’ Eve, eventually shortened to Halloween. Soul cakes small, sweet baked goods were distributed to the poor in exchange for prayers for the dead, which is considered the precursor to modern trick-or-treating.
Halloween food traditions evolved dramatically when Irish and Scottish immigrants brought their customs to America in the 19th century. By the 20th century, Halloween had transformed into the community-centered, candy-filled holiday we know today. Modern Halloween party food traditions jack-o’-lantern pizzas, mummy dogs, witch hat cookies, graveyard cakes really took off in the 1980s and 1990s as the holiday became more commercialized and family-focused.
Today, Halloween food is a massive industry. Americans spend over $3 billion on Halloween candy alone every year, and Halloween party food and themed recipes have become a major part of the celebration.
What Makes a Recipe “Halloween-Worthy”?
Not every spooky-looking dish qualifies as a true Halloween recipe. A great Halloween recipe hits the sweet spot between fun presentation, delicious flavor, and easy execution. Here’s what separates a genuinely Halloween-worthy recipe from something that’s just wearing a costume:
Visual impact: It needs to look the part. Whether that’s mummy-wrapped sausages, green slime guacamole, deviled eggs decorated as eyeballs, or a cake shaped like a graveyard the visual presentation is non-negotiable.
Theme alignment: Great Halloween recipes lean into the holiday’s imagery: ghosts, witches, spiders, pumpkins, bats, skeletons, blood (think raspberry coulis), and monsters of all kinds.
Flavor that holds up: The most common mistake people make is sacrificing taste for looks. The best Halloween recipes are delicious first, spooky second.
Crowd appeal: Halloween parties include kids, adults, and everyone in between. The best recipes work for all ages fun enough for children, sophisticated enough for adults.
Are Halloween Recipes Hard to Make?
Absolutely not and that’s part of the magic! Many of the most impressive Halloween recipes are deceptively simple. Mummy hot dogs take under 30 minutes. Monster rice krispie treats require no baking at all. Witch finger breadsticks can be made from store-bought dough. Graveyard dirt cups are assembled in minutes.
The key is knowing a few visual tricks like using black food gel, candy eyeballs, pretzel sticks, and piped frosting that can transform even the simplest dish into something hauntingly beautiful. Once you learn those tricks, easy Halloween recipes become second nature.
What Makes Halloween Recipes Different from Regular Recipes?
The difference isn’t in the cooking technique it’s in the intention and decoration. Most Halloween recipes use the same basic cooking methods as everyday food: baking, boiling, assembling, frying. But they layer on Halloween-specific elements:
- Color: Black, orange, green, and deep purple instead of natural food tones
- Shape: Pumpkins, bats, skulls, spiders, fingers, ghosts
- Names: “Monster Mash Meatballs,” “Witch’s Brew Punch,” “Graveyard Guacamole”
- Garnishes: Candy eyes, gummy worms, chocolate spiders, edible blood (raspberry sauce)
- Atmosphere: Even the serving platters, plates, and presentation contribute to the Halloween experience
Ingredients You Need
For this guide, our featured Halloween recipe is the wildly popular Halloween Mummy Hot Dogs also called Mummy Dogs or Crescent Mummy Hot Dogs. They’re the ultimate easy Halloween appetizer that both kids and adults go absolutely crazy for. Below you’ll find everything you need, explained in detail.
For the Halloween Mummy Hot Dogs
- 12 beef or pork hot dogs: Full-size hot dogs work best for this recipe. You want quality franks with good snap when bitten brands like Nathan’s Famous, Hebrew National, or Oscar Mayer work beautifully. All-beef hot dogs tend to have better flavor. You can also use chicken or turkey franks for a lighter version.
- 2 cans (8 oz each) refrigerated crescent roll dough: This is the secret weapon of mummy dogs. Pillsbury original crescent rolls are the gold standard. The buttery, flaky dough wraps around the hot dogs in overlapping strips to create the iconic mummy bandage look. Do not use crescent roll sheets you want the perforated dough that separates into triangles.
- 1 large egg: Used to make an egg wash that gets brushed over the crescent dough before baking. This gives the mummy wrappings a gorgeous golden-brown color and a slightly shiny appearance. Room temperature eggs work best.
- 1 tablespoon water: Mixed with the egg to thin it out for an easy-to-brush egg wash.
- 24 small candy eyeballs (2 per hot dog): These are available in the baking aisle of most grocery stores, on Amazon, or at Walmart. They’re the finishing touch that transforms a crescent-wrapped hot dog into an actual mummy. If you can’t find candy eyeballs, see the substitution section below.
- Yellow mustard: For the “eye glue.” A tiny dot of mustard on each candy eyeball helps it stick to the dough before baking. It also adds a subtle flavor that pairs wonderfully with the hot dog.
- Non-stick cooking spray or parchment paper: Essential for preventing sticking. Parchment paper is preferred as it makes cleanup a breeze.
- Pinch of coarse salt (optional): A light sprinkle over the egg-washed mummies before baking adds a savory depth and beautiful finish.
For the Dipping Sauces (Optional but Highly Recommended)
No mummy dog is complete without the right dipping sauce. Here are three options that look as Halloween-appropriate as they taste amazing:
- Ketchup: The classic. Also works as “monster blood” for Halloween presentation.
- Yellow mustard: Bright, tangy, and naturally Halloween-colored (orange!).
- “Swamp Dip” (Avocado Ranch): 1 ripe avocado mashed + ¼ cup sour cream + 2 tablespoons ranch dressing powder + squeeze of lemon juice. The green color is perfectly Halloween-spooky.
- “Witch’s Sauce” (Sriracha Mayo): 3 tablespoons mayonnaise + 1 tablespoon sriracha + ½ teaspoon garlic powder. For adults who want a kick.
Ingredient Substitutions & Notes
Hot dog substitutes: Mini cocktail sausages (little smokies) work great for a bite-sized party version use one strip of crescent dough per sausage. Veggie hot dogs or plant-based sausages are excellent for vegetarian guests. Even string cheese makes a fun “white mummy” version!
Crescent dough substitute: If crescent rolls aren’t available, refrigerated pizza dough cut into thin strips is a great alternative. Puff pastry sheets (thawed) cut into thin ribbons also work and produce an even flakier result.
Candy eyeballs substitute: Can’t find candy eyeballs? Use a toothpick to apply two dots of black food gel directly onto the baked mummies. Or use small pieces of black olive as eyes before baking. White M&Ms with a dot of black food marker are another creative option.
Egg wash substitute: Brush with melted butter instead of egg wash for a slightly richer flavor and similar golden color. For a dairy-free version, brush with olive oil.
Gluten-free option: Use gluten-free crescent roll dough (available at specialty stores and online) and GF hot dogs to make this recipe completely gluten-free.
How to Make Halloween Mummy Hot Dogs (Step-by-Step)
This recipe comes together in just about 25-30 minutes from start to finish making it one of the most genuinely easy Halloween recipes you’ll ever make. Follow these steps exactly and you’ll have perfect mummy dogs every single time.
Step 1: Prepare Your Pans & Oven
Preheat your oven to 375°F (190°C). This is the ideal temperature for crescent roll dough hot enough to puff up and turn golden, but not so hot that it burns before the inside cooks through.
Line two large baking sheets with parchment paper or silicone baking mats. If you don’t have either, spray generously with non-stick cooking spray and give the pans a light dusting of flour. You’ll need two sheet pans because 12 mummy dogs spread out more than you’d expect.
Let the crescent roll dough sit at room temperature for about 5 minutes before unrolling cold dough tears easily and is harder to work with.
Pat your hot dogs completely dry with paper towels. This step is crucial: excess moisture on the surface of the hot dogs can make the crescent dough soggy and prevent it from crisping up properly. Don’t skip it.
Step 2: Wrap the Mummies
This is the fun part! Open the crescent roll cans and carefully unroll the dough onto a clean, lightly floured work surface. Don’t separate the triangles yet you’ll be cutting strips from the sheet.
Using a sharp knife or pizza cutter, cut the dough into thin strips approximately ¼ to ½ inch wide. The strips don’t need to be perfectly uniform in fact, slightly irregular strips look MORE like real mummy bandages, which is exactly what you want.
Hold one hot dog in your non-dominant hand. Starting near one end of the hot dog, press the end of a dough strip firmly onto the surface of the frank. Begin wrapping the strip around the hot dog at a slight diagonal angle, overlapping slightly as you go. This overlapping creates the layered “bandage” appearance.
Switch to a new strip whenever the first one runs out just press the new piece firmly onto the end of the old strip to continue wrapping seamlessly. Wrap the entire hot dog, but leave a small gap near one end (about ½ inch) for the mummy’s “face” this is where the eyes will go.
Place each wrapped mummy hot dog onto the prepared baking sheet, seam-side down. Space them at least 1 inch apart they’ll expand slightly as the dough puffs up during baking.
Whisk together the egg and 1 tablespoon of water in a small bowl. Using a pastry brush (or even your clean fingertips), brush a thin, even layer of egg wash over the entire surface of each wrapped mummy. Every bit of exposed dough should get a light coating this is what gives them that beautiful golden-brown color.
If using, sprinkle a tiny pinch of coarse salt over the egg-washed mummies.
Step 3: Bake the Mummy Hot Dogs
Slide the baking sheets into the preheated oven, one on the upper-middle rack and one on the lower-middle rack.
Bake for 12-15 minutes, or until the crescent dough is puffed up, cooked through, and beautifully golden brown. Check at the 10-minute mark ovens vary, and you don’t want these to overbrown.
If you have two pans, rotate them halfway through baking (top pan goes to bottom rack, bottom pan goes to top rack) for even browning.
The mummies are done when the dough feels firm and dry to the touch (not soft or doughy) and has turned a deep golden color. The hot dogs inside will be fully heated through and will have plumped up slightly from the steam.
Remove from the oven and let them cool on the baking sheet for 3-5 minutes before handling. They’ll be very hot straight out of the oven!
Step 4: Prepare the Dipping Sauces
While the mummies are baking or cooling, prepare whichever dipping sauces you’re using.
For the Swamp Dip: Mash the avocado in a medium bowl until mostly smooth. Add sour cream, ranch dressing powder, and lemon juice. Mix well and season to taste with salt and pepper. Transfer to a serving bowl and garnish with a sprinkle of paprika or a few drops of hot sauce for Halloween drama.
For the Witch’s Sauce: Simply whisk together mayonnaise, sriracha, and garlic powder in a small bowl. Transfer to a squeeze bottle or small ramekin for serving.
Arrange your sauces in Halloween-themed bowls or ramekins. Label them with fun signs like “Monster Blood,” “Swamp Goo,” or “Witch’s Brew” for extra Halloween points.
Step 5: Add the Eyes & Serve
Now the magic moment! Once the mummies have cooled for a few minutes, it’s time to bring them to life (or un-life, as the case may be).
Place a tiny dot of yellow mustard on the back of two candy eyeballs. Press them firmly into the “face” gap you left on each mummy dog. The mustard acts as glue and the warmth of the freshly baked dough helps set them in place.
Arrange the finished mummy dogs on a Halloween-themed serving platter or board. For extra drama, create a “graveyard” scene on the platter using fresh parsley or herbs as “grass,” pretzel sticks as “bones,” and the dipping sauces arranged like bubbling cauldrons.
Serve immediately and watch them disappear!
Best Easy Halloween Recipe Ideas Beyond Mummy Dogs
Mummy Hot Dogs may be the star of the show, but a great Halloween party needs a full spread. Here are the most popular and easy Halloween recipes across every category to round out your haunted menu:
Easy Halloween Appetizers & Savory Snacks
Spider Web Deviled Eggs: Classic deviled eggs topped with a swirl of sriracha or ketchup piped into a spider web pattern, with a small olive “spider” in the center. These are always the first thing to disappear at parties.
Witch Finger Breadsticks: Store-bought bread dough shaped into long, knobby fingers with almond “fingernails” pressed in at the tip. Serve with marinara “blood” for dipping.
Jack-O’-Lantern Quesadillas: Regular cheese quesadillas with pumpkin-face designs cut into the top tortilla using a sharp knife before cooking. They’re adorable, cheesy, and kid-approved.
Graveyard Guacamole: Your favorite guacamole recipe, served in a cauldron-shaped bowl with tortilla chips shaped into tombstones (cut with a knife or cookie cutter) sticking out of the top.
Mummy Pizza Rolls: Individual pizza bites wrapped in crescent dough strips just like the mummy dogs, baked at 375°F for 12 minutes. Add candy eyes for the full mummy effect.
Spooky Caprese Skewers: Cherry tomatoes, fresh mozzarella balls, and basil threaded on black skewers. Simple, delicious, and the red-and-white color scheme is very Halloween.
Easy Halloween Desserts & Treats
Monster Rice Krispie Treats: Classic rice krispie treats dyed green with food coloring, shaped into monster heads, and decorated with candy eyeballs, red licorice mouths, and chocolate chip horns. Zero baking required.
Witch Hat Cookies: Oreo cookies as the brim, Hershey’s Kisses dipped in chocolate as the hat cone, assembled with a dab of frosting. Five-minute assembly, maximum drama.
Graveyard Brownies: A pan of chocolate brownies decorated with crushed Oreo “dirt,” candy-pumpkin decorations, and Milano cookie “tombstones” with “RIP” written in frosting. Every Halloween party needs this.
Ghost Meringues: Light, airy meringue cookies piped into ghost shapes with a chocolate chip “eyes” pressed in. They’re ethereal, delicate, and hauntingly delicious.
Caramel Apple Monsters: Classic caramel apples on sticks, decorated with M&M eyes, pretzel stick arms, and gummy worm hair. Kids love making these as much as eating them.
Candy Corn Parfaits: Layers of orange Jell-O, whipped cream, and pineapple chunks in clear cups to mimic the look of candy corn. Serve chilled.
Easy Halloween Drinks & Punches
Witch’s Brew Punch: Lime sherbet + lemon-lime soda + green Hawaiian Punch + dry ice for a bubbling, smoky cauldron effect. It’s visually stunning and absolutely delicious.
Monster Blood Smoothies: A simple strawberry-raspberry smoothie blended with banana. The deep red color is naturally “bloody” and the flavor is phenomenal. Serve in clear cups with a “WARNING: Monster Blood” tag.
Candy Corn Hot Chocolate: White hot chocolate layered with orange food coloring and topped with whipped cream. A cozy Halloween warmer for chilly October evenings.
Pro Tips for the BEST Halloween Recipes
After years of making Halloween food for parties, school events, and family gatherings, I’ve learned some tricks that make everything easier and more impressive. These tips apply especially to our featured Mummy Hot Dogs, but they work across all Halloween recipes.
My #1 Secret for Perfect Mummy Dogs Every Time
Dry your hot dogs completely before wrapping. I cannot stress this enough. I’ve seen beautifully wrapped mummy dogs turn out soggy, pale, and doughy because the moisture from the hot dogs transferred into the crescent dough during baking. Pat them dry with multiple paper towels and let them air-dry on a wire rack for 5-10 minutes before you start wrapping.
My second secret? Don’t stretch the dough strips. When wrapping the hot dogs, lay the strips loosely rather than pulling them tight. Stretched dough contracts when it bakes and can pop off, revealing the hot dog underneath and ruining the mummy effect.
And third: Use cold dough straight from the fridge but only after a 5-minute rest. Too-cold dough tears easily; too-warm dough gets sticky and loses its shape. The five-minute rest at room temperature is the sweet spot.
How to Achieve the Spookiest Visual Presentation
For Halloween recipes in general, here’s how to maximize the visual impact:
Work with a limited color palette. The most visually striking Halloween food uses just 2-3 colors. For savory dishes, orange and black are iconic. For desserts, green and black or purple and orange pop beautifully.
Add candy eyes to EVERYTHING. Seriously candy eyeballs are the single best purchase you can make for Halloween cooking. They instantly make any food look Halloween-themed, from brownies to cheese balls to pasta dishes. Buy them in bulk online.
Use serving vessels that match the theme. A cauldron-shaped bowl, skull-shaped serving plate, or jack-o’-lantern punch bowl transforms even ordinary food into a Halloween centerpiece.
Create height and dimension on your platter. Don’t lay everything flat. Use small ramekins, cake stands, and elevated trays to create levels. This makes the spread look more dramatic and professional.
Incorporate unexpected textures. Gummy worms “crawling” out of a brownie pan, spider webs made from white chocolate drizzle, or crushed Oreo “dirt” covering the surface of a dessert adds tactile interest and visual depth.
Common Mistakes to Avoid
Overcrowding the baking pan: Give crescent-wrapped items plenty of space. When they’re too close together, they steam each other and the dough doesn’t brown properly. Use two pans if needed.
Skipping the egg wash: Without egg wash, crescent dough bakes to a pale, matte finish that looks unappetizing. The egg wash is what gives mummy dogs and other pastry-wrapped dishes that gorgeous golden glow.
Making everything too far in advance: Most Halloween appetizers taste best fresh. Mummy dogs in particular lose their crispiness after about an hour. If you need to prep ahead, assemble them (but don’t bake) and refrigerate. Bake just before serving.
Forgetting dietary restrictions: Halloween parties include guests with all kinds of dietary needs. Always have at least one gluten-free, one vegetarian, and one nut-free option available. Mummy dogs are easily adaptable to all three.
Overcomplicating the decorations: The most common beginner mistake is trying to make food look TOO perfect. Halloween food is supposed to look a little rough, a little uneven, a little “spooky.” Embrace the imperfection it’s actually more in the spirit of the holiday.
How to Decorate & Present Your Halloween Recipes
Presentation is half the battle with Halloween food. A mediocre recipe beautifully presented will get more excitement than a perfect recipe served in a boring way.
Simple Home Decoration Ideas for Your Halloween Spread
The Graveyard Platter: Use a large wooden board or dark slate slab as your base. Arrange your mummy dogs, deviled eggs, and finger foods on it. Add pretzel sticks arranged as “bones,” fresh rosemary sprigs as “grass,” and small Halloween signs made from toothpicks and paper as labels.
The Haunted Cauldron Setup: Serve dips and sauces in mini cauldron bowls (widely available at Target, Michael’s, and Amazon every October). They’re reusable year after year and instantly transform any ordinary dip into a Witch’s Brew.
The Spider Web Cheese Board: A white cheese ball decorated with a spider web pattern using black olive slices, surrounded by crackers, grapes, and other charcuterie items. Dramatic, elegant, and surprisingly simple.
The Frankenstein Veggie Tray: A round platter with broccoli “hair,” olive eyes, red pepper strip mouth, and a body made from green bell pepper strips, cucumber rounds, and snap peas. Perfect for kids who need something healthy at the party.
The Dry Ice Punch Bowl: Any punch or drink becomes instantly dramatic with a chunk of dry ice at the bottom. The “smoky” bubbling effect is absolutely mesmerizing. Always handle dry ice with gloves and don’t let it touch food directly.
Professional Party Presentation Tips
Use consistent serving ware: Choose a color scheme for your serveware (all black, or black and orange) and stick to it. Consistency makes even a simple spread look curated and intentional.
Label everything: Small chalkboard signs or folded cards with fun Halloween names for each dish (“Mummy Dogs,” “Monster Blood Dip,” “Witch’s Fingers”) add personality and help guests with dietary restrictions know what’s in each dish.
Think about flow: Arrange food in an order that makes sense: savory items first, desserts at the end, drinks accessible from multiple sides. Guests should be able to navigate the food table without bottlenecks.
Photography matters: If you’re posting your Halloween party food on social media (and you should it’s gorgeous!), shoot from directly above for a flat-lay shot of the whole spread, or get close-up shots of individual items. Natural window light is your best friend.
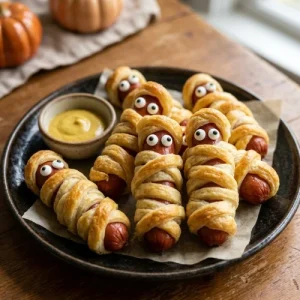
Easy Halloween Mummy Dogs (Crescent Roll Party Recipe)
Equipment
- 2 large baking sheets
- Parchment Paper
- Sharp knife or pizza cutter
- Pastry brush
- Small mixing bowl
- Wire Cooling Rack
- Cutting board
Ingredients
- 12 beef or pork hot dogs full size
- 2 cans 8 oz each refrigerated crescent roll dough
- 1 large egg
- 1 tbsp water
- 24 candy eyeballs
- 1 tsp yellow mustard for eyeball adhesive
- Non-stick cooking spray or parchment paper
- Pinch of coarse salt optional
- 1 ripe avocado
- ¼ cup sour cream
- 2 tbsp dry ranch seasoning mix
- 1 tsp fresh lemon juice
- Salt and pepper to taste
Instructions
- Preparation: 1. Preheat oven to 375°F (190°C). Line two baking sheets with parchment paper. 2.Pat hot dogs completely dry with paper towels. Set aside. 3.Let crescent dough rest at room temperature for 5 minutes.
- Wrapping the Mummies: 4. Unroll crescent dough and cut into ¼-inch wide strips using a sharp knife. 5. Starting at one end of each hot dog, wrap dough strips around in overlapping diagonal layers. 6. Leave a ½-inch gap near one end for the mummy “face.” 7. Place wrapped mummies seam-side down on prepared baking sheets, 1 inch apart.
- Egg Wash & Baking: 8. Whisk egg and water together. Brush over all exposed dough surfaces. 9. Sprinkle lightly with coarse salt if desired. 10. Bake 12–15 minutes until dough is puffed and deep golden brown. 11. Cool on pan for 3–5 minutes.
- Finishing: 12. Apply a dot of mustard to the back of each candy eyeball. 13. Press 2 eyes into the face gap of each mummy. 14. Arrange on a Halloween platter and serve with dipping sauces.
- Swamp Dip: 15. Mash avocado, mix in sour cream, ranch seasoning, and lemon juice. Season to taste.
Notes
- Make Ahead: Assemble (do not bake) up to 4 hours ahead. Refrigerate covered. Egg wash and bake fresh before serving.
- Freezing: Bake, cool completely, freeze in single layer, then bag. Reheat from frozen at 350°F for 18–22 min.
- Storage: Leftovers keep refrigerated for 3 days. Reheat in oven at 350°F for 8–10 min. Do NOT microwave.
- Mini Version: Use cocktail sausages for bite-sized mummies. Bake 10–12 min.
- Puff Pastry Option: Substitute puff pastry strips. Bake at 400°F for 15–18 min.
- Vegetarian: Use veggie hot dogs. Works exactly the same!
- If candy eyeballs unavailable: Use 2 dots of black food gel per mummy with a toothpick.

Super easy and creative recipes! The mummy hot dogs look absolutely perfect and spooky for a kids’ Halloween party.