

Best Red Velvet Cake Recipe (Moist, Soft & Southern Style)

If you’ve been searching for the best red velvet cake recipe that is moist, soft, and loaded with rich Southern flavor you just found it. This is not your average red velvet cake. This is the homemade red velvet cake that your grandmother would be proud of, with a deep velvety crumb, the most gorgeous red color, and a dreamy cream cheese frosting that takes it completely over the top.
Whether you’re making a red velvet cake layer for a birthday, a red velvet sheet cake for a crowd, or even red velvet cupcakes for a party this recipe covers it all. I’ve tested, tweaked, and perfected this recipe dozens of times, and today I’m sharing every secret I know so you can bake with total confidence. Let’s get into it.
How to Make Red Velvet Cake (Step-by-Step)
Making this homemade red velvet cake from scratch is much easier than most people think. Here’s everything you need to know before you start, plus the key tips that make all the difference.
Step 1: Prepare Your Pans & Oven
Start by preheating your oven and preparing your pans before you do anything else. Line them with parchment paper this is non-negotiable. Nothing is more heartbreaking than a perfectly baked cake that sticks to the pan and tears apart when you try to remove it.
For a red velvet sheet cake, simply use a 9×13 inch greased baking pan instead of round pans it’s even easier and perfect for feeding a crowd.
Step 2: Make the Cake Batter
The most important thing to remember when making this batter is to use room temperature ingredients butter, eggs, and buttermilk all need to be at room temperature before you begin. Cold butter won’t cream properly, cold eggs can cause the batter to curdle, and cold buttermilk affects the final texture. Take everything out of the fridge at least 30–45 minutes before baking.
Beat the butter and sugar together for a full 3–4 minutes until pale and very fluffy — don’t rush this step. This is what creates air in the batter and gives you a lighter, softer crumb. Then you’ll add oil, eggs, and vanilla before alternating the dry ingredients with the red buttermilk mixture.
The moment the flour goes in, switch to low speed and mix only until just combined. Overmixing is the single biggest mistake people make with cake batter. Once the flour is mixed in, gluten develops quickly and overmixing makes your cake tough and dense instead of soft and tender.
Step 3: Bake the Cake Layers
Divide the batter evenly between your pans and bake until a toothpick inserted in the center comes out with just a few moist crumbs, not wet batter, but not bone dry either. A completely clean toothpick actually means you’ve slightly overbaked it.
Let the cakes cool in their pans for 15 minutes before turning them out. Then cool completely on a wire rack for at least 1 full hour. Never frost a warm cake. The warmth melts the frosting and everything slides into a beautiful but frustrating mess.
For red velvet cupcakes, fill lined muffin cups ⅔ full and bake for 18–20 minutes. Same rules apply let them cool completely before frosting.
Step 4: Make the Cream Cheese Frosting
The key to a perfectly smooth, lump-free frosting is beating the cream cheese and butter together very thoroughly before adding any powdered sugar. Any lumps left at this stage will be impossible to remove later.
Add the sifted powdered sugar gradually on low speed to avoid a powdery explosion, then beat on high until the frosting is light, fluffy, and beautiful. If your frosting feels too soft to spread or pipe, simply refrigerate it for 20–30 minutes and it firms right up.
Some bakers love a red velvet buttercream instead a butter-forward frosting with just a little cream cheese for tang. This works especially well for red velvet cupcakes where you want a frosting that holds a tall, beautiful swirl without drooping.
Step 5: Assemble & Frost the Cake
Always apply a thin crumb coat first, a very thin layer of frosting all over the cake that seals in the crumbs. Refrigerate for 20 minutes, then apply your final thick, beautiful layer of frosting. This two-step process is what gives you a clean, professional-looking finish with no red crumbs showing through your white frosting.
For a stunning double red velvet cake with three layers, simply bake the batter in three pans instead of two and stack all three layers with frosting between each one.
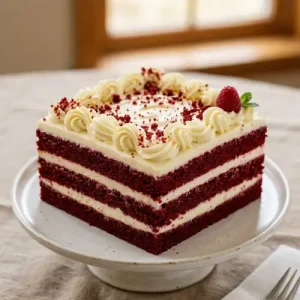
3 Layer Red Velvet Cake

Equipment
- 2 9-inch Round Cake Pan
- 1 Stand Mixer or Hand Mixer
- 1 Offset Spatula For frosting
- 1 Bench Scraper For smooth sides
- 1 Wire Cooling Rack
- 1 Sifter For flour & sugar
- 3 Mixing Bowls
Ingredients
- 2½ cups 310g all-purpose flour, sifted
- 2 tablespoons unsweetened cocoa powder
- 1½ teaspoons baking soda
- 1 teaspoon baking powder
- ½ teaspoon salt
- 1½ cups 300g granulated sugar
- ½ cup 115g unsalted butter, softened
- ½ cup 120ml vegetable oil
- 2 large eggs room temperature
- 2 teaspoons pure vanilla extract
- 1 cup 240ml buttermilk, room temperature
- 1 teaspoon white vinegar
- 2 tablespoons red food coloring liquid or 1.5 tsp gel
- 450 g 16 oz full-fat block cream cheese, softened
- ½ cup 115g unsalted butter, softened
- 4 cups 480g powdered sugar, sifted
- 2 teaspoons vanilla extract
- Pinch of salt
Instructions
For the Cake
- Preheat oven to 350°F (175°C). Grease and line two 9-inch round cake pans.
- Sift flour, cocoa powder, baking soda, baking powder, and salt in a bowl. Set aside.
- Beat butter and sugar on medium-high for 3–4 minutes until pale and fluffy.
- Add oil, mix well. Add eggs one at a time, then vanilla.
- Whisk buttermilk, vinegar, and food coloring together.
- Alternate adding dry ingredients and buttermilk mixture to batter three dry additions, two wet mixing on low until just combined.
- Divide batter evenly into prepared pans.
- Bake 28–32 minutes until a toothpick comes out with just a few moist crumbs.
- Cool in pans 15 minutes, then turn out onto wire racks to cool completely.
For the Frosting
- Beat cream cheese and butter together for 2–3 minutes until smooth with zero lumps.
- Gradually add sifted powdered sugar on low speed, ½ cup at a time.
- Add vanilla and salt. Beat on medium-high for 2 minutes until fluffy and smooth.
- If too soft, refrigerate 20–30 minutes before using.
For Assembly
- Place first cake layer on a serving plate or cake board.
- Spread a generous layer of frosting on top.
- Place second cake layer on top, pressing gently.
- Apply a thin crumb coat all over. Refrigerate 20 minutes.
- Apply final thick layer of frosting and smooth with a bench scraper or spatula.
- Garnish with red velvet crumbs, pipe decorations, or fresh fruit.
- Refrigerate until ready to serve. Bring to room temperature 30 minutes before serving.
Notes
- Room temperature ingredients are non-negotiable for the best texture.
- Don’t overmix once flour is added mix just until combined.
- For a red velvet sheet cake, use a 9×13 inch pan and bake 30–35 minutes.
- For red velvet cupcakes, fill muffin cups ⅔ full and bake 18–20 minutes.
- Cake layers can be made 2 days ahead. Wrap tightly and store at room temperature.
- Frosted cake keeps in the refrigerator up to 5 days.
- Unfrosted cake layers freeze beautifully for up to 3 months.

The hint of cocoa and the tang of buttermilk create the most incredible, authentic flavor profile. It baked up beautifully soft and became an instant family favorite!
This recipe is an absolute masterpiece the cake is incredibly moist and has the perfect velvety crumb. It is officially the only red velvet recipe I will ever use!
This is the most authentic and delicious Southern red velvet cake I have ever baked. It is incredibly soft, perfectly balanced, and the frosting is absolutely heavenly!